

Connectors allow users to link external services — Gmail, Outlook, Notion, Google Drive, and Google Calendar — to AI Chat Pro. Once connected, AI Chat Pro can retrieve relevant context from those services during conversations, such as emails, files, notes, and calendar events.
Requirements
- Prerequisite: AI Chat Pro must be installed and active on your workspace. Connectors is a core feature of AI Chat Pro. Each service integration (Gmail, Outlook, Google Drive, Notion, Google Calendar) is a separate child extension that must be installed individually.
- Installation: Install each service extension you want to offer from the Marketplace:
- AI Chat Pro Gmail
- AI Chat Pro Outlook
- AI Chat Pro Google Drive
- AI Chat Pro Notion
- AI Chat Pro Google Calendar.
Note: Only installed extensions appear in the Connectors modal.
Activation
Before users can connect any service, complete the following steps:
- Step 1 — Install: Go to Marketplace and install each service extension you want to offer: AI Chat Pro Gmail, AI Chat Pro Outlook, AI Chat Pro Google Drive, AI Chat Pro Notion, AI Chat Pro Google Calendar. Each extension adds its service to the Connectors modal.
- Step 2 — Enable Connectors: Settings → AI Chat Pro Settings, scroll to the Connectors section, and toggle Enable Connectors on. Then toggle on each service you want to make available (Connector: Gmail, Connector: Outlook, etc.).
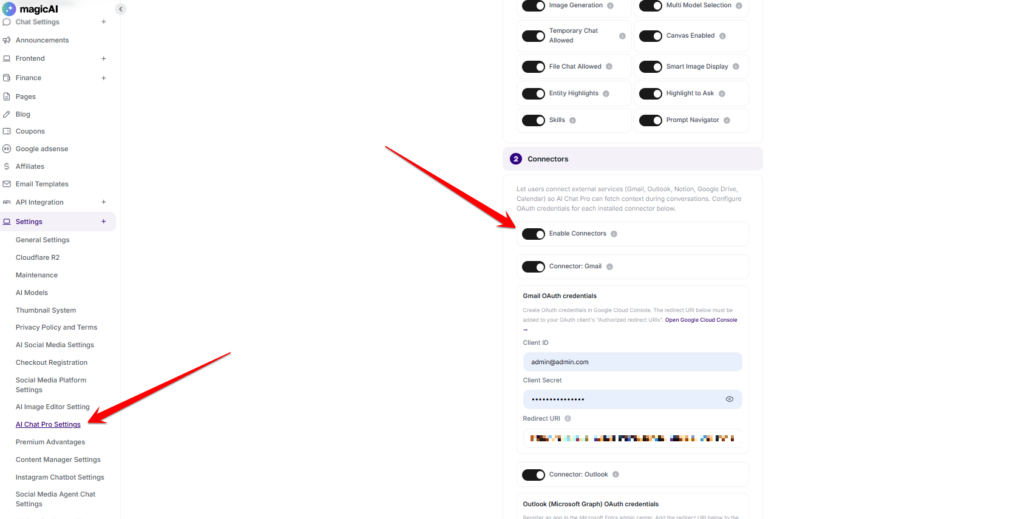
- Step 3 — Enter OAuth credentials: For each enabled connector, enter the Client ID, Client Secret, and any additional required fields. The Redirect URI for each connector is displayed in the settings panel and must be registered in the service’s developer console (see per-connector setup below).
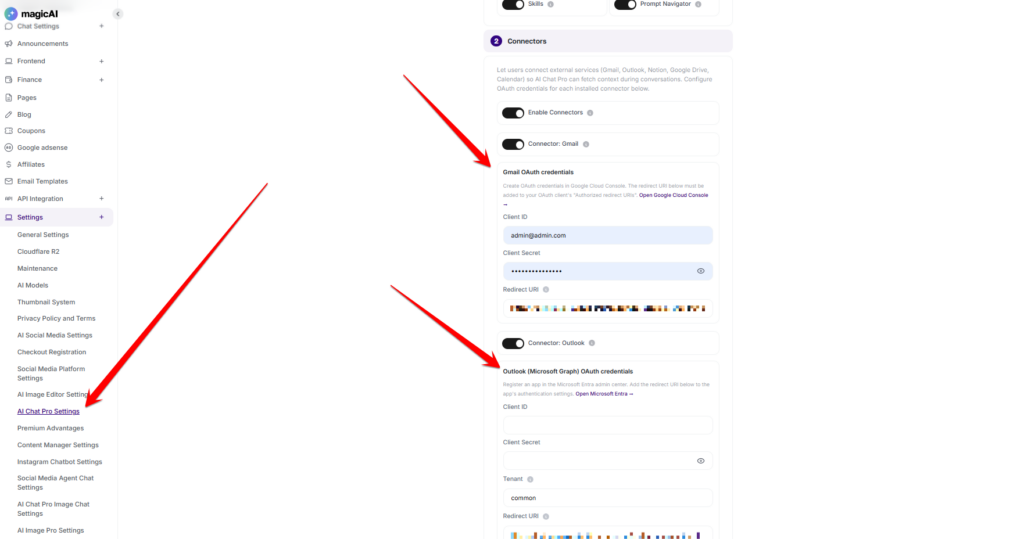
- Step 4 — Enable on Plans: Go to Finance → Pricing Plans, select each plan that should include Connectors, and enable it.
- Step 5 — Save: Click Save after completing all configuration.
How Users Access Connectors
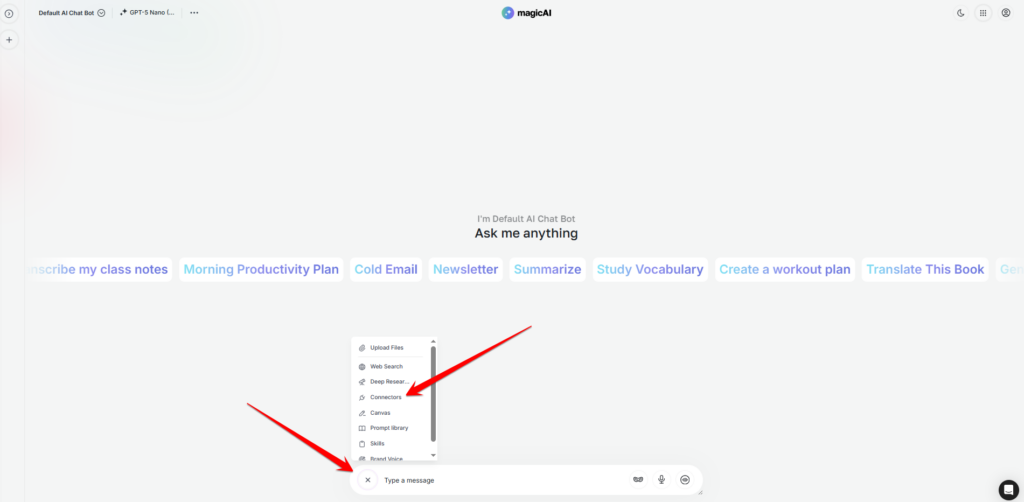
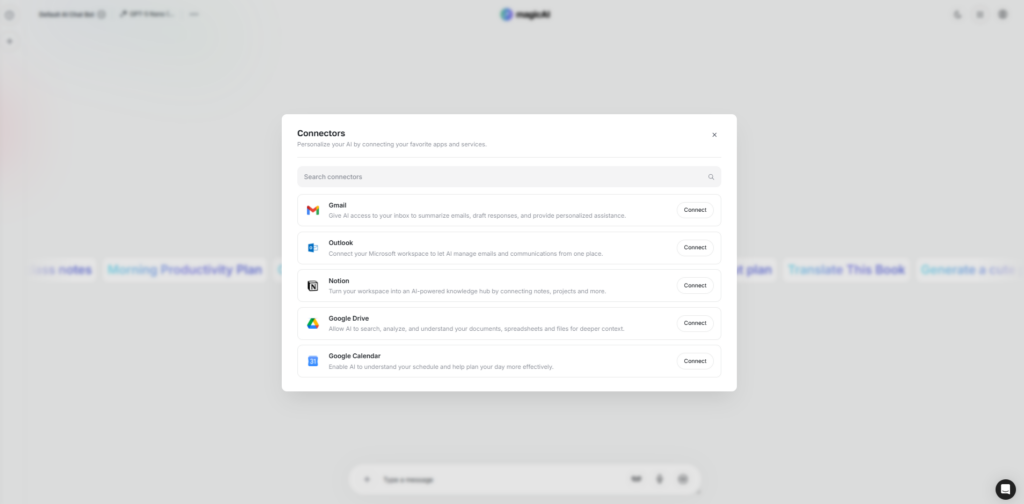
Users open the Connectors modal by clicking the + button in the chat input area and selecting Connectors. The modal displays all available services with their connection status. Users click Connect next to a service and complete the OAuth authorization flow in their browser. Once connected, the service is available for AI Chat Pro to use during that user’s conversations.
How It Works in Chat
Once a connector is connected, AI Chat Pro retrieves relevant information from that service automatically when the conversation calls for it. For example:
- “Summarize my latest unread emails” — retrieves from Gmail or Outlook
- “Find the contract file in Drive” — searches Google Drive
- “What meetings do I have tomorrow?” — queries Google Calendar
- “Search my Notion notes about marketing” — searches Notion pages and databases
AI Chat Pro only retrieves data when relevant to the conversation. Source badges are shown in the response to indicate which connector was used.
Gmail
Allows AI Chat Pro to access the user’s Gmail inbox to retrieve, summarize, and reference emails during conversations.
Setting Up Gmail OAuth
- Create a Google Cloud Project: Open console.cloud.google.com, create or select a project, go to APIs & Services → Library, and enable the Gmail API.
- Configure OAuth Consent Screen: Go to APIs & Services → OAuth Consent Screen. Select External. Fill in App Name, User Support Email, and Developer Contact Email. Add the following scopes: openid, userinfo.email, userinfo.profile, gmail.readonly.
- Create OAuth Credentials: Go to APIs & Services → Credentials → Create Credentials → OAuth Client ID. Select Web Application. Add the Redirect URI shown in Settings → AI Chat Pro Settings → Gmail OAuth Credentials to the Authorized Redirect URIs list. Save.
- Copy credentials: Copy the Client ID and Client Secret.
- Enter in AI Chat Pro: Go to Settings → AI Chat Pro Settings → Gmail OAuth Credentials and enter the Client ID and Client Secret. Save.
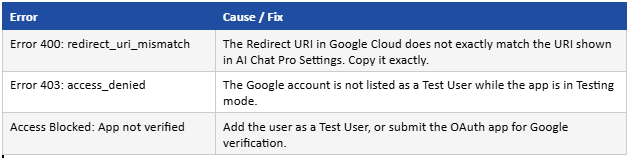
⚠️ Note: If your OAuth app is in Testing mode, add user accounts under OAuth Consent Screen → Test Users. Only listed accounts can authorize the connection.
Common Issues
Outlook
Allows AI Chat Pro to access the user’s Outlook inbox via Microsoft Graph to retrieve and reference emails during conversations. Supports Microsoft 365 work, school, and personal Outlook accounts.
Setting Up Outlook OAuth
- Register an application: Open Microsoft Entra Admin Center and sign in. Go to Applications → App Registrations → New Registration.
- Configure the registration: Enter a name (e.g. AI Chat Pro Outlook Integration). For Supported Account Types, select Any Entra ID Tenant + Personal Microsoft Accounts. Set Platform to Web and paste the Redirect URI shown in Settings → AI Chat Pro Settings → Outlook (Microsoft Graph) OAuth Credentials. Click Register.
- Copy Client ID: From the application’s Overview page, copy the Application (client) ID.
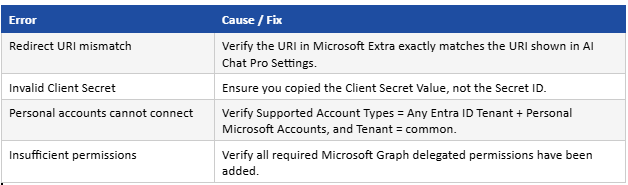
- Create a Client Secret: Go to Certificates & Secrets → New Client Secret. Enter a description, set an expiry, and click Add. Copy the generated secret value immediately — Microsoft only displays it once.
- Add API Permissions: Go to API Permissions → Add Permission → Microsoft Graph → Delegated Permissions. Add: openid, offline_access, email, profile, User.Read, Mail.Read. Click Add Permissions.
- Enter in AI Chat Pro: Go to Settings → AI Chat Pro Settings → Outlook (Microsoft Graph) OAuth Credentials. Enter the Client ID, Client Secret, and set Tenant to common. Save.
Common Issues
Notion
Allows AI Chat Pro to access the user’s Notion workspace to search and retrieve notes, pages, and databases during conversations.
Setting Up Notion OAuth
- Open Notion Integrations: Go to the Notion Integrations page and navigate to Connections → New Connection.
- Create a new connection: Enter a name (e.g. AI Chat Pro). For Authentication Method, select OAuth — do not select Access Token. Select the workspace(s) where the connection should be available. Click Create Connection.
- Add Redirect URI: Open the connection’s settings and locate the OAuth configuration section. Paste the Redirect URI shown in Settings → AI Chat Pro Settings → Notion OAuth Credentials into the Redirect URIs field. Save.
- Copy credentials: From the connection settings, copy the OAuth Client ID and OAuth Client Secret.
- Enter in AI Chat Pro: Go to Settings → AI Chat Pro Settings → Notion OAuth Credentials. Enter the OAuth Client ID and OAuth Client Secret. Save.
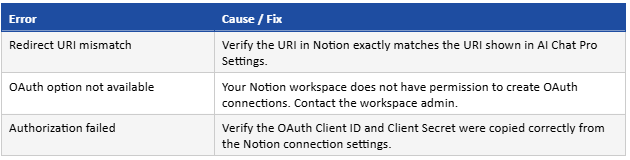
⚠️ Note: If you do not see the option to create a connection, contact your Notion workspace administrator and request permission to create integrations.
Common Issues
Google Drive
Allows AI Chat Pro to search and access the user’s Google Drive files, documents, and spreadsheets to provide relevant context during conversations.
Setting Up Google Drive OAuth
- Create a Google Cloud Project: Open console.cloud.google.com, create or select a project, go to APIs & Services → Library, and enable the Google Drive API.
- Configure OAuth Consent Screen: Go to APIs & Services → OAuth Consent Screen. Select External. Fill in App Name, User Support Email, and Developer Contact Email. Add the following scopes: openid, userinfo.email, userinfo.profile, drive.readonly.
- Create OAuth Credentials: Go to APIs & Services → Credentials → Create Credentials → OAuth Client ID. Select Web Application. Add the Redirect URI shown in Settings → AI Chat Pro Settings → Google Drive OAuth Credentials to the Authorized Redirect URIs list. Save.
- Copy credentials: Copy the Client ID and Client Secret.
- Enter in AI Chat Pro: Go to Settings → AI Chat Pro Settings → Google Drive OAuth Credentials and enter the Client ID and Client Secret. Save.
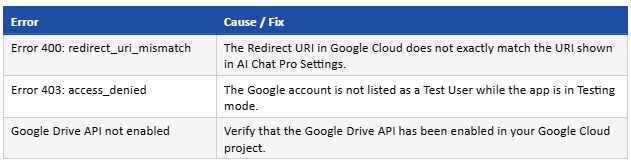
⚠️ Note: If your OAuth app is in Testing mode, add user accounts under OAuth Consent Screen → Test Users.
Common Issues
Google Calendar
Allows AI Chat Pro to access the user’s Google Calendar to retrieve events and schedule information during conversations.
Setting Up Google Calendar OAuth
- Create a Google Cloud Project: Open console.cloud.google.com, create or select a project, go to APIs & Services → Library, and enable the Google Calendar API.
- Configure OAuth Consent Screen: Go to APIs & Services → OAuth Consent Screen. Select External. Fill in App Name, User Support Email, and Developer Contact Email. Add the following scopes: openid, userinfo.email, userinfo.profile, calendar.readonly.
- Create OAuth Credentials: Go to APIs & Services → Credentials → Create Credentials → OAuth Client ID. Select Web Application. Add the Redirect URI shown in Settings → AI Chat Pro Settings → Google Calendar OAuth Credentials to the Authorized Redirect URIs list. Save.
- Copy credentials: Copy the Client ID and Client Secret.
- Enter in AI Chat Pro: Go to Settings → AI Chat Pro Settings → Google Calendar OAuth Credentials and enter the Client ID and Client Secret. Save.
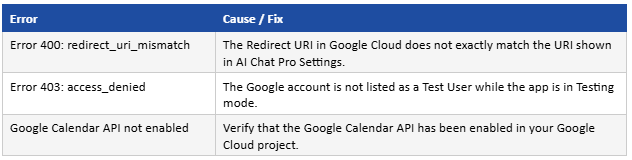
⚠️ Note: If your OAuth app is in Testing mode, add user accounts under OAuth Consent Screen → Test Users.
Common Issues
Admin Controls
All Connector settings are managed at Settings → AI Chat Pro Settings → Connectors:
- Enable Connectors — master toggle that enables or disables the entire Connectors feature for all users
- Connector: Gmail / Outlook / Notion / Google Drive / Google Calendar — individual toggle per service; disabling a service hides it from the user-facing Connectors modal
- OAuth Credentials — Client ID, Client Secret, and Redirect URI fields for each enabled service
Click Save after making any changes.
⚠️ Note: Plan-based access to Connectors is managed via Finance → Pricing Plans. If Connectors are disabled on a user’s plan, the Connectors option is hidden from their chat input menu.