Social Media Suite — DM Comment Automation is a child extension for Social Media Suite that automatically responds to commenters on your social media posts via direct message (DM) and optional public replies. It enables businesses to engage audiences at scale by triggering personalized message flows the moment someone comments on a post or reel.
Prerequisite: Social Media Suite must be installed, active, and your social media accounts must already be connected before using this extension. If you haven’t set up your platform connections yet, complete that first.
Requirements
- Social Media Suite installed and active on your workspace
- At least one social media account connected with the required permissions (see platform-specific notes below)
- Cron job configured — without this, comments are received but no DMs or replies are ever sent
- Publicly accessible domain with HTTPS (required for webhooks)
Platform webhook registered and verified (covered in the Social Media Suite setup guide)
Installation & Activation
Install Social Media Suite — DM Comment Automation from the Marketplace.
Once installed, enable the feature per pricing plan: Finance → Pricing Plans → enable Comment & DM Automation.
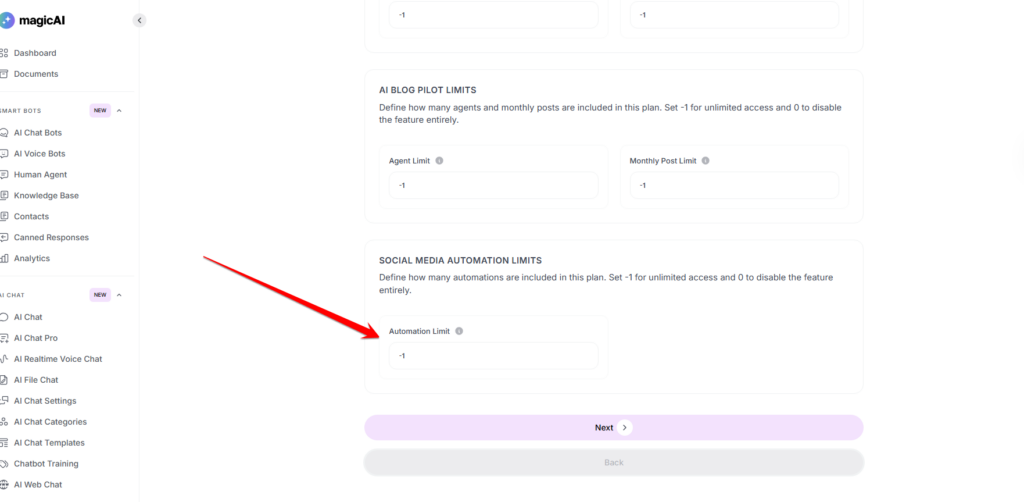
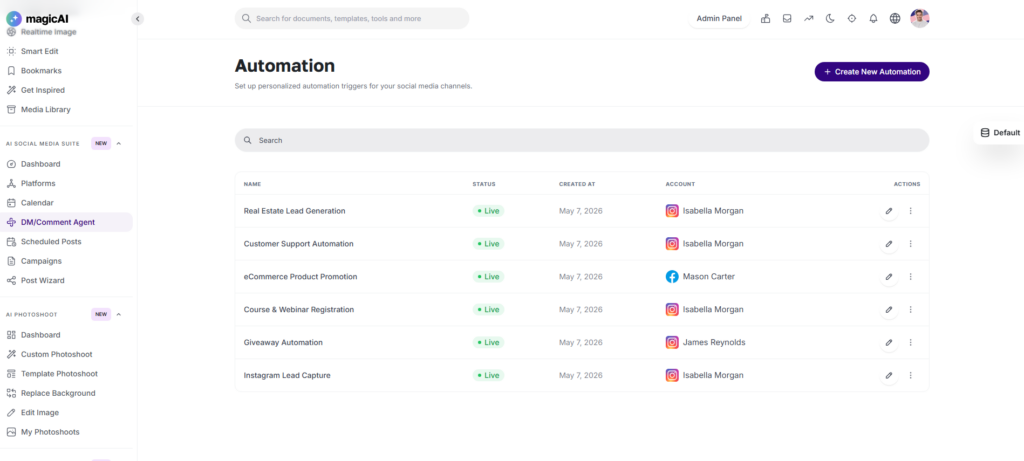
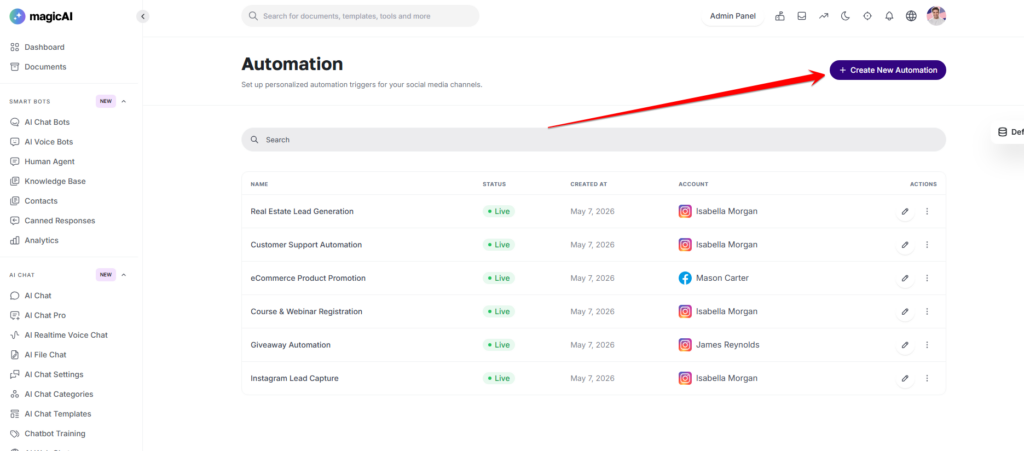
Navigate to Social Media Suite → Automation from the sidebar. This page lists all existing automations with their name, status (Live or Draft), creation date, connected account, and action controls.
Click + Create New Automation to begin.
Additional Platform Requirements for Automation
The Social Media Suite setup guide covers connecting your accounts. The automation feature requires a few additional permissions and webhook subscriptions beyond what’s needed for basic posting. Check each platform below.
Your Facebook app needs these additional permissions enabled (on top of what’s required for posting):
| Permission | Why it's needed |
|---|---|
| pages_messaging | Send DMs via Messenger |
| pages_manage_metadata | Subscribe to webhook events |
Your webhook must be subscribed to the feed field (Page object). The system automatically filters incoming events and processes only comments, ignoring likes, new posts, etc.
⚠️ If you previously connected your Facebook account without granting pages_manage_metadata, disconnect and reconnect to apply the new permission.
Webhook URL: /social-media/webhook/facebook
Instagram automation requires a Professional account (Business or Creator) linked to a Facebook Business Page. Personal profiles are not supported.
Your app needs these additional permissions:
| Permission | Why it's needed |
|---|---|
| instagram_manage_comments | Read and reply to comments |
| instagram_manage_messages | Send DMs (Private Reply) |
Your webhook must be subscribed to the comments field (Instagram object). No other field subscriptions are needed.
Webhook URL: /social-media/webhook/instagram
How Instagram DMs work (Private Reply):
Instagram automation does not send traditional DMs — it sends a Private Reply via the Instagram Messenger API. Here’s what to expect:
- The reply arrives as a DM to the commenter.
- A “Sent a private reply” note appears under the original comment (visible to others).
- First-time recipients see it as a Message Request and must accept it before they can read it.
- Private Replies can only be sent within 7 days of the original comment.
API rate limits apply — errors will occur if exceeded.
X (Twitter)
X automation requires a Pro Plan on X Developer Portal (the Free plan does not include Account Activity API access).
In addition to the credentials entered during Social Media Suite setup, you must:
- Register the webhook URL in X Developer Portal → Products → Premium → Dev Environments.
- Add a subscription to specify which X account’s events to listen to (via the Account Activity API)
Webhook URL: /social-media/automation/webhook/x
X treats replies as tweet replies (tweet_create_events with a non-null in_reply_to_status_id). Both public replies (reply tweet) and DMs are supported.
⚠️ DM sending requires your app’s permission to be set to “Read and write and Direct message“. If you change this setting after initial setup, you must regenerate your Access Tokens.
TikTok
TikTok does not provide DM API access to third-party apps. Only public comment replies are supported.
Your TikTok app needs these scopes approved:
| Scope | Why it's needed |
|---|---|
| comment.list | Read comment list |
| comment.create | Reply to comments |
Your webhook must be subscribed to the comment.create event.
Webhook URL: /social-media/automation/webhook/tiktok
When creating a TikTok automation, only use the Public Reply action. Text, Button, Image, and Quick Reply DM actions will not work for TikTok.
Youtube
YouTube comment automation allows users to automatically reply to comments on their YouTube videos. When a comment matches the configured trigger, the system posts a public reply automatically. Unlike other platforms, YouTube does not support webhooks, the system polls for new comments every 5 minutes using the YouTube Data API v3.
⚠️ YouTube does not support DMs. Only public comment replies are available for YouTube automations.
Setting up Google Cloud credentials:
- Go to console.cloud.google.com and create a new project
- Navigate to APIs & Services → Library, search for YouTube Data API v3, and enable it
- Go to APIs & Services → OAuth consent screen → configure and save
- Go to APIs & Services → Credentials → Create Credentials → OAuth client ID
- Select Web application and add the following Authorized Redirect URIs:
- {APP_URL}/social-media/oauth/callback/youtube
- {APP_URL}/social-media/oauth/callback/youtube-shorts
- Copy the Client ID and Client Secret
Enter credentials in the admin panel:
Go to Dashboard → Admin → Settings → Social Media Platform Settings → YouTube and enter the Client ID and Client Secret.
Connect the account:
Go to Dashboard → Social Media → Platforms, find the YouTube or YouTube Shorts card, click Connect, and complete the Google OAuth flow granting all requested permissions.
⚠️ YouTube Shorts must be connected separately from YouTube via the Platforms page.
Creating a YouTube automation:
When creating an automation with a YouTube account selected, configure the trigger as follows:
- Specific Video — targets a single video; paste the video ID (the part after ?v= in the URL)
- All Recent Videos — monitors your last 10 uploaded videos for new comments
Optionally set Keyword Filters to only trigger on comments containing specific words. In the Do node, add your Public Reply content — this is posted as a visible reply under the matched comment. Multiple reply variations can be added and are rotated randomly.
⚠️ Only the Public Reply action is supported for YouTube. Text, Button, Image, and Quick Reply DM actions are not available and should not be used for YouTube automations.
Add YouTube to the Platform Support Summary table:
Platform | Comment Capture | DM Support | Public Reply | Notes |
YouTube | ✅ | ❌ Not supported | ✅ | Polling-based (every 5 min); requires YouTube Data API v3 + OAuth credentials; YouTube Shorts connected separately |
Troubleshooting:
Issue | Likely Cause | Solution |
YouTube comments not detected | Cron job not running | Ensure php artisan schedule:run runs every minute |
403 forbidden on YouTube API calls | OAuth scopes missing | Disconnect and reconnect the account, granting all requested permissions |
Replies not posting on YouTube | youtube.force-ssl scope missing | Reconnect the account and grant comment management permission |
YouTube token expired | Refresh token invalidated | Reconnect the YouTube account via Dashboard → Social Media → Platforms |
YouTube Shorts not appearing | Connected as main YouTube account | Connect YouTube Shorts separately via the Platforms page |
Cron Job (Required)
A cron job must be configured for automations to execute. Without it, comments are received and stored, but no DMs or replies are ever sent.
Click here to view the Cron Job Configuration Guide.
Creating an Automation
Step 1 — Select Account
A setup wizard opens. Select a connected social media account from the dropdown. Only accounts that are fully connected with the required permissions appear. Once a platform is selected, a Platform Info notice displays relevant API limitations. Click Continue.
Step 2 — Build the Workflow
The automation builder opens as a visual node-based canvas with two core nodes:
When — defines the trigger that starts the automation
Do — defines the action performed once the trigger fires
Configuring the Trigger (When node)
Click + Add Trigger inside the When node, then select a trigger type. After selecting, the configuration panel walks through three sub-steps:
Select Post — Choose which content triggers the automation:
- All Posts — monitors all posts and reels
- Specific Post — targets a single post from your connected account.
- Next Post — triggers on the next post you publish (Facebook/Instagram).
Set Trigger — Define the comment condition:
- Any Comment — fires on every comment.
- Specific Keywords — fires only when a comment contains defined words (e.g., “price”, “link”, “where to buy”).
Leave Comment (Optional) — Toggle Enable Public Replies to also post a visible reply in the comment thread. When enabled, you can add multiple reply variations — these are randomly rotated to appear natural and avoid spam detection signals. Click Save to confirm.
A Smart Delay option is also available in the trigger area to insert a timed wait period before the action fires.
Configuring the Action (Do node)
Click + Add Action to open the Send DM panel. Build your message using these content blocks (which can be added, removed, and reordered):
| Block | Description |
|---|---|
| + Add Text | Plain text message |
| + Add Button | Button with a label and URL |
| + Add Image | Image attachment |
| + Add Quick Replies | Predefined reply options for the recipient |
| + Add Delay | Pause between message elements |
A + Smart Delay node can also be added directly on the canvas between the trigger and action to introduce a timed wait before the DM is sent.
Step 3 — Name and Publish
Enter a name for the automation in the title field at the top of the builder. Then either:
- Click Update to save as a Draft (inactive).
- Click Set Live to activate immediately.
Automations cannot be set live if required account permissions are missing — the system enforces this at activation time.
Platform Support Summary
| Platform | Comment Capture | DM Support | Public Reply | Notes |
|---|---|---|---|---|
| ✅ | ✅ | ✅ | Requires pages_messaging + pages_manage_metadata | |
| ✅ | ✅ (Private Reply) | ✅ | Business/Creator account + linked Facebook Page required; 7-day reply window | |
| X (Twitter) | ✅ | ✅ | ✅ | Requires Pro Plan; X Enterprise API for full post fetching |
| TikTok | ✅ | ❌ Not supported | ✅ | DM API not available to third-party apps |
Managing Automations
The Automation list page shows all automations with their current status, creation date, and linked account. Each automation can be edited via the pencil icon or managed via the actions menu. Multiple automations can be created per platform and per account.
Admin Controls
Plan-Based Access: Enable or disable Comment & DM Automation per pricing plan via Finance → Pricing Plans. If the feature is disabled on a user’s plan, an upgrade notice is shown and automation activation is prevented.
Troubleshooting
| Issue | Likely Cause | Solution |
|---|---|---|
| Comments are received but no DM/reply is sent | Cron job not configured | Add * * * * * cd /path && php artisan schedule:run to crontab |
| Automation logs show "failed" | API credential error or expired token | Check error_message in the log; disconnect and reconnect the platform account |
| Webhook verification failing | Token mismatch | Ensure the Webhook Secret in the admin panel exactly matches the Verify Token in the Developer Console — no extra spaces or case differences |
| DM not sent on Instagram | Comment older than 7 days | Test with a fresh comment |
| No DM option on TikTok | Platform limitation | Use Public Reply action only — TikTok does not allow third-party DM access |
| Instagram Private Reply shows as Message Request | First-time contact | Expected behavior — recipient must accept the message request |
| X webhook not registering | Free developer plan | Upgrade to Basic plan ($100/month) or higher |
| Automation not triggering | Status is Draft | Set automation status to Live |
| Token expired | Tokens expire or are invalidated after permission changes | Disconnect and reconnect the account from Dashboard → User → Social Media |
Frequently Asked Questions
Q: Do I need to set up a new webhook just for automation? No. If you already completed the Social Media Suite setup and registered your webhooks, the same webhook endpoints handle automation events. Just make sure you’re subscribed to the correct fields (feed for Facebook, comments for Instagram, comment.create for TikTok).
Q: Can I respond only to comments containing specific words? Yes. When configuring the trigger, choose Specific Keywords and define the words that should trigger the automation (e.g., “price”, “info”, “link”).
Q: Can I send DMs on TikTok? No. TikTok does not provide DM API access to third-party apps. Only public comment replies are supported.
Q: Will the Instagram recipient see the DM immediately? If it’s the first time you’re messaging that person, they’ll receive it as a Message Request and must accept it before they can read your message.
Q: Can I run multiple automations for the same platform? Yes. Multiple automations can be created per platform and per account. Each automation can target different posts or use different keyword filters.
Q: What happens if the automation fails? Failed automations are logged with an error_message in the ext_sm_pending_automations table and in storage/logs/laravel.log. The most common causes are expired tokens or missing API permissions.
Q: Can I send DMs to YouTube commenters? No. YouTube does not provide DM API access. Only public comment replies are supported for YouTube automations.
Q: Why is there a delay before YouTube comments are detected?
YouTube does not support real-time webhooks. The system polls for new comments every 5 minutes, so there may be up to a 5-minute delay between a comment being posted and the automation triggering.